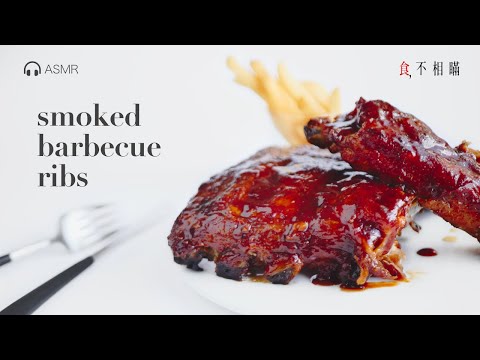
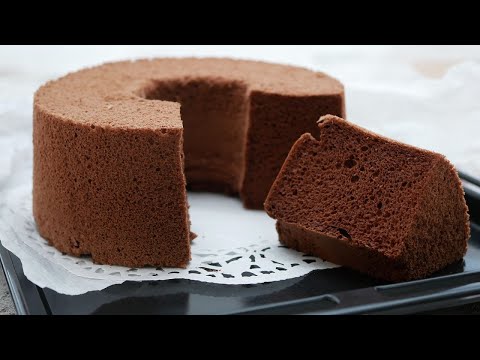
【家居新品】鐘意入廚嘅你仲用緊氣炸鍋?Out了,今時今日梗係用SHARP嘅3合1纖巧蒸氣焗爐啦!佢有齊中、西餐所需要嘅煮食功能,整甜品都得,認真係煮食神器呀〜
https://pc3mag.com/sharp-3-in-1-steam-oven/
#SHARP #蒸焗爐 #SHARP3合1纖巧蒸氣焗爐 #煮食 #入廚
————————————————————
記得Follow埋小編我哋PC3嘅帳號哦
MeWe:https://bit.ly/3mvanuO
Facebook:https://bit.ly/39zmTG8
Instgram:https://bit.ly/3gZz7b2
Youtube:https://bit.ly/37mQDdG10
————————————————————
設定小編我哋PC3專頁「搶先看」!優先取得科技生活著數玩樂情報
設定教學:https://bit.ly/335Fwwp
同時也有15部Youtube影片,追蹤數超過40萬的網紅糖餃子Sweet Dumpling,也在其Youtube影片中提到,Hello friends! Today we're going to share with you how to make juicy oven-baked smoked BBQ ribs at home. Copying and practicing a recipe from a famo...
sharp oven 在 Dairy & Cream Facebook 的最讚貼文
{Recipe} 5-ingredient Cheddar Cheese Cookies 🧀 Decided to whip up something simple that requires no egg and actual work only takes up less than 15min! Instead of cream cheese, I used @tillamook signature Sharp Cheddar Cheese which is naturally aged and boasts really bold, distinctive flavors. P.s. it is easier to work with shredded ones vs the sliced or block version.
Ingredients
50g shredded Tillamook Cheddar Cheese
40g unsalted butter
30g fine sugar
20g almond powder
80g cake flour
Method:
Melt the cheddar cheese and butter in a Bain Marie or microwaveable bowl.
Mix with a whisk till most cheese are blended with the butter(or use a hand blender for better results)
Whisk in the remaining ingredients
Form dough into the shape of a round patty of 1.5cm thickness. Wrap and chill in fridge for at least 1 hour
Remove from fridge and slice the dough into 8 wedges
Preheat oven to 160 degrees and bake for 25-30min until cookies turn golden brown.
You can get Tillamook Sharp Cheddar Cheese from selected @finestfoodsg @coldstoragesg @giantsingapore and online @redmartcom at an offer of $8.25 instead of $9.95 per pack
sharp oven 在 Resepi Mutiara HATI Facebook 的最佳貼文
Resepi Korean Cheese Garlic Bread
Malam ni berkorean la kita anak beranak ye. Tak rajin tak larat pun kena buat jugak, tekak melayu ubah la sikit rasa.
Bahan-Bahan Roti:
500gm tepung roti
75gm gula
1 paket yis (11gm)
120gm susu segar sejuk (dari peti ais)
140gm air sejuk (dari peti ais)
80gm mentega/marjerin
1 biji telur
1/2 sudu kecil garam halus
Bahan-Bahan Butter Garlic Sauce:
200gm mentega
1 biji telur
40gm whipping cream/susu segar
2 sudu besar mayonis
8 ulas bawang putih – dicincang halus
3 sudu besar daun parsley kering
3 sudu besar cili flakes
Bahan-Bahan Cream Cheese:
300gm cream cheese
Cara-caranya:
Sediakan Roti –
1. Saya guna BM (bread maker), satukan semua bahan set putar doh, biarkan BM bekerja hingga BM berhenti lebih kurang 20 minit.
2. Terus timbang doh 65gm atau 70gm, bulat/rounding kemas letak atas loyang yang telah disapu sedikit mentega biarkan doh rehat naik dua kali ganda.
3. Bakar suhu 170 selama 20 minit atau hingga masak bergantung oven masing-masing.
Sediakan Butter Garlic Sauce –
4. Cairkan mentega, kemudian satukan semua bahan kacau sebati dan ketepikan dahulu.
Sediakan Cream Cheese – ini cara saya
5. Pukul cream cheese hingga gebu berkrim masukkan ke dalam piping bag, gunting hujungnya.
Step seterusnya:
6. Ambil roti yang telah siap dibakar tadi, guna pisau bergerigi untuk dapat belahan yang sharp, belah kepada empat bahagian atau enam bahagian ikut saiz roti dan citarasa. Jangan belah sampai putus.
Cuba Resepi Ni: Resepi Puding Roti Cip Coklat
7. Pipe cream cheese di tengah, di celah belahan roti, kemudian siram atau celup roti ke dalam butter garlic sauce.
8. Lapik loyang dengan baking paper, susun roti tadi bakar lagi sekali pada suhu 150 selama 15 minit atau nak tahu roti sudah masak ke belum timbul bau garlic yang sangat harum dan lelehan mentega kelihatan keperangan. Siap sedia dinikmati.
Nota:
Resipi cream cheese yang asal manis ada add in gula. Saya tak letak tekak orang melayu tak boleh terima, so buat cara saya.
Roti ni ada rasa cream cheese original rasa yang asal, ada pedas sebab cili flakes tu kita buat sendiri, roti tu pula dah siap ada rasa lemak-lemak manis masin sikit. Bila makan anak-anak saya letak cili sos macam pizza. Memang mantop dorang suka sangat.
Resepi Korean Cheese Garlic Bread
Resepi Oleh: Julia Aleen Aireish
sharp oven 在 糖餃子Sweet Dumpling Youtube 的最讚貼文
Hello friends! Today we're going to share with you how to make juicy oven-baked smoked BBQ ribs at home.
Copying and practicing a recipe from a famous restaurant is the most challenging thing, but it is very interesting and we learn new things from it. In this video, we copied the taste of the famous pepper ribs, but made some modifications, because some ingredients are not found in this city. Chili’s slow-cooked pork ribs has been a top seller on the menu since 1986 and is still the best seller today. So this is a must try.
To make smoked flavor BBQ ribs without a smoker, we slow cook in the oven, and make the Chili's BBQ sauce with smokey chipotle in adobo, or it can be made by liquid smoke instead. The flavor is found in the sauce, and the cooking secret is slow-braising which can keep the meat juicy and tender like the original. You can use the barbecue sauce suggested in the recipe below or use your favorite homemade or store-bought sauce. Hope you like it. Enjoy. :)
📍 Please follow us on Instagram:: https://www.instagram.com/sweetdumplingofficial/
📍 Welcome to follow us on FB: https://www.facebook.com/sweet.dumpling.studio/
-----------------------------------------------------------------------
How to make Oven-Baked Smoked BBQ Ribs
✎ Ingredients
pork ribs 950g
☞ for dry marinades
coarse salt 70g
black pepper 15g
ground white pepper 4g
cayenne pepper 2g
granulated sugar 3.5g
garlic powder 1.5g
onion powder 1.5g
☞ for BBQ sauce
chipotle peppers in adobo 7g
regular soy sauce 32g
tomato paste 70g
ketchup 20g
chicken broth 30g
apple cider vinegar 35g
dark beer 45g
fresh orange juice 87g
minced garlic 10g
chili powder 1.5g
onion powder 5g
salt 3g
black pepper 2.5g
light brown sugar 130g
1. Combine together coarse salt, black pepper, ground white pepper, cayenne pepper, granulated sugar, garlic powder and onion powder, mix well.
2. Line a baking tray with foil or parchment paper.
3. Place the ribs on the baking tray, pat dry the ribs with paper towels on both sides.
4. Using a sharp knife to take off excess fat. Just keep a little fat.
5. Remove the silver skins or whitish dense skin on the bone side of the ribs.
6. Then turn the meatier side facing up, generously season with 1 tablespoon of dry marinades.
7. Cover with another foil, shiny side out.
8. Preheat the oven to 135C, bake for 2.5~3 hours.
9. While the ribs bake, make the barbecue sauce. Add all the sauce ingredients together, using an immersion blender to blend the ingredients until smooth. Pour into a saucepan and cook over medium-low heat for 15-20 minutes, stirring often until thicker.
10. Once baked, remove foil and transfer to a new baking tray and brush ribs with the barbecue sauce on both sides. Let the bone side facing up.
11. Preheat the oven to 220C, bake for 5 minutes, then turn the meatier side facing up and brush a little bit of sauce and bake for 10 minutes or until ribs have been caramelized.
12. Transfer the ribs to a plate or a cutting board, brush with sauce again if needed and serve.
-----------------------------------------------------------------------
Chapter:
00:00 intro
00:35 Ingredients
01:07 how to make season spice
02:33 prepare the ribs
03:56 slow cook ribs in oven
04:55 how to make smoked BBQ sauce
08:32 caramelized the ribs
11:11 enjoy
-----------------------------------------------------------------------
#BBQRibs
#copycatRecipes
![post-title](https://i.ytimg.com/vi/UAENNVvNJq0/hqdefault.jpg)
sharp oven 在 cook kafemaru Youtube 的精選貼文
朝食にも素晴らしく良い、と思う!
ざっくり食感、中はふわっとなホットビスケットです。
強力粉レシピ。薄力粉のように混ぜすぎてグルテンができてしまって焼き上がりがカチコチになる心配もない。
ただしいつまでも触っているとどんどんバターが溶けるので、素早くです。
途中途中で冷凍庫で冷やしながらでもokです。
スコーンもHビスケットも同じような感じですが、卵を加えていないのでHビスケットに分類されるのかも^^
うまく焼ければ、スコーンで言われるところの「Wolf's Mouth 狼の口」に出会えます。
「がおーーーーーーーっ!」
レシピは下にあります↓
==================================================
最新刊も発売中~本屋さんで見てもらえると嬉しいです!
みんなぜひぜひ買ってねーーーー!!!
大人気YouTuber “cook kafemaru”の
「罪深いスイーツ」
おかげ様で2刷になりました。
Amazonはこちらから購入できます↓↓↓
https://www.amazon.co.jp//dp/4046048948/
==================================================
「世界一作りやすいおうちスイーツ 」
もおかげ様で10刷になりました。
どうもありがとうございます。
Amazonで購入できます。↓↓↓
https://www.amazon.co.jp/dp/4046045116/
もしもお住いの近くの本屋さんになかったら、セブンイレブンの
オムニ7でネット予約し、セブンイレブン店頭受け取りで買うことができます!
=============================================
【Ingredients】 Makes about 5-6 scones
250g Bread flour
8g Baking powder
20g Cane sugar(or Granulated sugar)
2g salt
70g Cold Unsalted butter
110g Cold Soy milk(+more for brush the top~1sp)
【Directions】
①Dice into 1cm cubes and cool it in the freezer for 10minutes.
②Combine flour, baking powder, sugar, and salt in a bowl and mix well.
③Add cold butter, using your fingers to work the butter into the dry ingredients until it resembles coarse crumbs.
④Add Cold soy milk, use a dough scraper or spoon to stir until combined.
⑤knead the dough until it comes together.
***If the dough is too sticky, add flour until it is manageable.
⑥Using a rolling pin, to flatten layers.
Fold it in three.
⑦Rotate the dough and fold in three.again,repeating this step 3-4 times.
⑧Place in the freezer for 15 minutes.
Preheat the oven to 392 °F/200℃.
⑨Cut the dough into circles with a cutter.
Or to avoid leftover dough scraps, cut the dough into squares or diamonds with a bench knife or sharp knife.
⑩Once you have gotten as many biscuits as possible out of the dough, gently re-work the dough to get out another biscuit.
⑪Place on a baking sheet.
Brush the biscuits with milk, to enhance browning.
⑫Bake for 20 mins until risen and golden on the top.
***れしぴ置き場***
【材料】5-6個 (抜型は68mmと58mmを使っています)
強力粉 250g
ベーキングパウダー 8g
きび砂糖(or グラニュー糖) 20g
塩 2g
冷たい無塩バター 70g
冷たい豆乳 110g(+トップに塗るための少量~小さじ1程度)
代わりに牛乳でもok
【作り方】
①バターは1cm位にカットして冷凍庫で10分ほど冷やす。
②ボウルに強力粉、ベーキングパウダー、砂糖、塩を入れてよく混ぜる。
③そこに冷たいバターを加えて指でバターを潰しながら粉に混ぜ込んでいく。さらさらの状態になればok
④よく冷やした豆乳を加えてカードやまたはスプーンなどでバターが溶け出さないよう手早く混ぜる。
***気温が高い時期はすべての材料を冷凍庫で冷やしても。
⑤ひとかたまりになるよう少しこねてまとめる。
使う小麦粉の種類によってもしべたつくようなら、ここで少し小麦粉を足して調整する。
⑥麺棒で生地を伸ばして、三つ折りにする。
⑦生地を90℃回転させ、また伸ばして三つ折りにする。
これを3-4回繰り返す。厚さ2cmにまとめる。
⑧冷凍庫で15分冷やす。
オーブンを200℃に予熱スタート。
⑨生地を丸型で抜く。
⑩型で抜いて残った生地はひとまとめにし、また抜く。
***丸型は可愛いが無駄が出るので、包丁で四角や三角にカットしても。こうすると丸型で抜くよりも生地の無駄がない。
⑪天板に抜いた生地を並べて、上に刷毛を使って豆乳を塗る。
豆乳を塗ることで焼き色がつく。
⑫膨らんできつね色になるまで20分焼く。
***焼き立てが美味しいですが、翌日食べる時はホイルに包んでトースターなどで温めるか、ラップをしてほんの少しレンチンしてください。
冷凍するときはファスナー付き袋にいれ、自然解凍後トースターで温めて下さい。
生地のまま冷凍も出来ます。
好きな大きさにカットしてからファスナー付き袋に入れて冷凍、焼くときは早めに冷蔵庫へ移しておき、そのあとに焼きます。
![post-title](https://i.ytimg.com/vi/qiGN1b3nZ6U/hqdefault.jpg)
sharp oven 在 cook kafemaru Youtube 的最佳貼文
ノンオイルで米粉シフォンケーキ焼いてみました。
プレーンだとさっぱりしすぎるので、ココアを加えて♪
ふわふわもっちりで朝食にもおやつにもぴったりなケーキになりました。豆乳でよりもっちりになります。
パンのようなケーキのような懐かしい味です、米粉さんありがとう^^
レシピは下にあります↓
フォロー&いいね! も お願いします!!!!!!
twitter
https://twitter.com/cookkafemaru
instagram
https://www.instagram.com/kafemaru/?hl=ja
==================================================
最新刊も発売中~本屋さんで見てもらえると嬉しいです!
みんなぜひぜひ買ってねーーーー!!!
大人気YouTuber “cook kafemaru”の
「罪深いスイーツ」
Amazonはこちらから購入できます↓↓↓
https://www.amazon.co.jp//dp/4046048948/
==================================================
「世界一作りやすいおうちスイーツ 」
もおかげ様で10刷になりました。
どうもありがとうございます。
Amazonで購入できます。↓↓↓
https://www.amazon.co.jp/dp/4046045116/
もしもお住いの近くの本屋さんになかったら、セブンイレブンの
オムニ7でネット予約し、セブンイレブン店頭受け取りで買うことができます!
=============================================
【Ingredients】17cm chiffon cake pan
Egg yolk mixture:
4 Egg yolks
100g Soy milk(or milk)
15g Cocoa powder
70g Rice flour
Meringue :
4 Egg white
50g Cane sugar(or Granulated sugar)
【Directions】
①Put 3 egg yolks in a bowl, and put 4 egg whites in another bowl.
Let the egg white sit in a fridge.
②Mix the ● ingredients and once dissolved.
③Whisk the egg yolk.
④Add ② and rice flour,mix.
Preheat the oven at 338 °F/170℃.
⑤Take the egg white out from the fridge. Beat it lightly until watery
⑥When it becomes white and fluffy, add sugar in 3 parts,and once formed into a firm meringue.
Hand-mixer slowly for 1min.
⑦Using a whisk, fold in ⅓ of the egg whites in the batter until the mixture is homogeneous.
⑧Transfer the batter to the bowl that held the meringue, and mix the batter using a cut-and-fold motion, to leave as much of the air in the meringue as possible.
⑨Pour the batter into the chiffon cake mold.
⑩Bake at 170℃ for 28 minutes.
⑪Stick the cake pan on a tall bottle or invert the cake pan onto a cooling rack.
Let it cool completely (over 3 hours).
⑫To extract the cake, run a thin sharp knife or thin spatula around both the outer and inner edge of the cake.
Dust powder sugar on top, if you like, and enjoy!
【材料】17cm シフォン型
卵黄生地:
卵黄(L) 4個
豆乳(or 牛乳) 100g
ココアパウダー 15g
米粉 70g
メレンゲ:
卵白(L) 4 個
きび砂糖(or グラニュー糖) 50g
【作り方】
①ボウルに卵黄、卵白を入れて、卵白は冷蔵庫で冷やしておく。
***室温が高い日は冷凍庫で10-15分冷やすと良い。
細かい気泡のメレンゲにすることが出来ます。
②●の材料を混ぜてよく溶かしておく。
***豆乳は軽く温めるとココアが綺麗に溶けます。
③卵黄をよく混ぜる。
④②と米粉を加えてよく混ぜる。
オーブンを170℃に予熱スタート。
⑤よく冷えた卵白に砂糖を3回に分けて加えてメレンゲを作る。
最初に低速でほぐして白っぽくなったら、1回目の砂糖を加える。
⑥砂糖が溶けてなじんだら2回目の砂糖を加えてさらに立てる。
筋が出たら3回目の砂糖を加えて立てる。
ココアの油分がメレンゲの泡を潰すのでしっかり目に立てる。
最後気泡を調えるために低速で1分ほど回す。
⑦メレンゲの1/3を、④の卵黄生地に入れ、しっかりと混ぜる。
⑧残りのメレンゲは半分ずつ加え、泡を潰さないように切り混ぜする。
⑨型に生地を流し入れる。
⑩170℃のオーブンで28分焼く。
⑪焼き上がったらボトルなどに逆さにさして3時間以上冷ます。
***焼き上がりの生地の部分が触れなければいいので、高さのあるものに乗せて逆さまにして冷ます。
シフォン型に張り付いた生地が沈みこまないように逆さまに冷まします。
⑫完全に冷めたら薄手のナイフやシフォンナイフなどで、中央の筒部分と周囲にぐるりと差し込んで生地を外す。
手はずしでも出来ます。
お好みで粉糖などを振ってどうぞ。
●保存はビニール袋などに入れて乾燥させないようにします。
気温が高い日は冷蔵庫へ。
*シフォンケーキはメレンゲが決め手!
メレンゲがうまく出来ていればオイルなしでもふわふわな焼き上がりになります、翌日もふわふわなままです。
*シフォンケーキは生地が型に張り付くことで美味しく焼けます、型は製菓材料店などで
売られている「アルミシフォン型」がおススメ。
時々テフロン加工をしたものがありますが、NG!
生地が張り付かないのと、逆さまに冷やすのに向いていません。
また、プレゼントにはそのまま贈れて便利な紙型ですが、熱伝導が良くなくて長めに焼くことに
なります、あまり長く焼くとパサつくので、ご注意ください。
***今回使った米粉はこちら。
波里さんの菓子・料理用 お米の粉
https://www.namisato.co.jp/retail/
スーパーなどで比較的手に入りやすい米粉です。
米粉も色々な種類があり、粒子の細かさが違ってくるため、米粉のメーカーや種類が変わると出来上がりにも差異が出ます。
できましたら同じ米粉を使っていただけると同じように焼き上がると思います。
![post-title](https://i.ytimg.com/vi/TOy6YnxA7Wg/hqdefault.jpg)
sharp oven 在 Healsio & Oven | Sharp 的相關結果
3-in-1 slim 25-liter steam oven. Slim body- Thin body and only 39cm depth. Extra-large oven cavity - 25L capacity and oven cavity has 387mm width, ... ... <看更多>
sharp oven 在 Types of Microwaves & Carousel Ovens - Sharp USA 的相關結果
Unsure of the right type of microwave for you? Sharp offers a variety of microwave ovens such as countertop, carousel, over-the-range, and drawer models. ... <看更多>
sharp oven 在 水波爐,健康美味0微波,好料理輕鬆上桌- SHARP 夏普 的相關結果
SHARP HEALSIO 「水波爐」是業界唯一過熱水蒸氣低氧烹調,透過紅外線溫度感知,滿足炸烤蒸炒多樣化菜色需求,全程0微波無油煙,廚房只要有水波爐,料理無難事。 ... <看更多>